Email: sales@kangmugroup.com Phone: 0086-13588958091


17. Neonatal emergency care model can be used for neonatal care, airway intubation, intravenous injection (Appendix - Neonatal emergency care model)
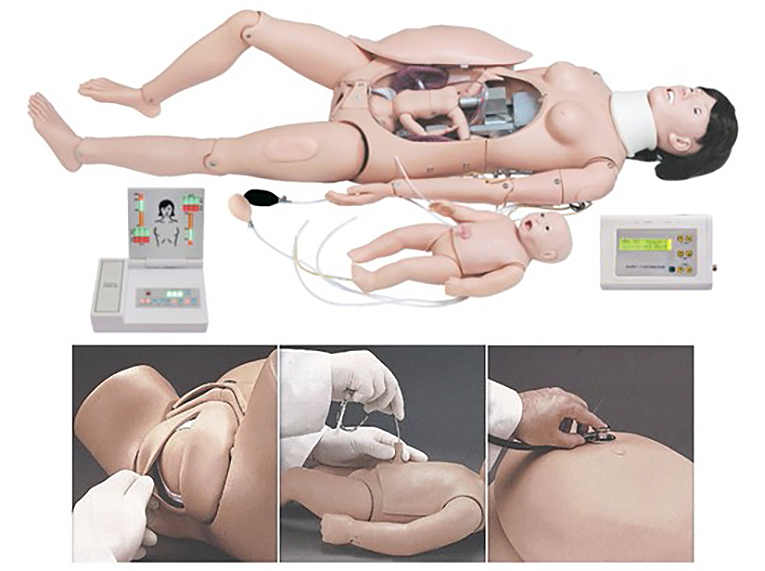
II. Methods of use
1. Advanced labor and first aid simulator (mother) automatic delivery system:
Note: Automatic delivery system, simulate the whole process of delivery, first connect the automatic delivery and fetal heartbeat controller power cord, automatic delivery and fetal heartbeat controller and simulator connection communication line (3 pins), automatic delivery and fetal heartbeat controller and simulator connection communication line (9 pins) (see the side view of the automatic delivery and fetal heartbeat controller), and then turn on the controller switch, the automatic delivery system will simulate delivery The system will simulate the entire labor process.
The sides of the Automatic Labor and Fetal Heartbeat Controller are in order from left to right:
1. Power switch
2. Power cord
3. Communication cable (3 pins) connecting the automatic delivery and fetal heartbeat controller with the simulator.
4. Automatic delivery and fetal heartbeat controller and simulator connection communication line (9 pins)
A. Brief description of the movement process of the automatic delivery system:
(1) When the power is turned on and energized, the motor will automatically return to the initial position and the indicator light changes from green to off, waiting for the start of one delivery operation; at this time, you can press the temporary/restoration button to start the delivery process. The indicator light turns red. During this process until the end of labor, pressing the pause/resume button will pause and start the labor process.
2) When the labor is completed, the electric stops rotating and stops at the farthest end. And the indicator light changes from red to off, waiting for the return operation.
3) Pressing the temporary/resume button again starts the return process. Until the initial position is reached.
4) Cycle the execution from step 2).
B. Automatic Labor and Fetal Heartbeat Controller Keypad and LCD Description: from left to right
1) The lower keys heart rate + and heart rate - control the increase and decrease of the heart rate; and display the heart rate on the upper corresponding liquid crystal. Display range (80-180) beats/minute;
(2) The lower button volume +, volume -, control the increase and decrease of heart rate volume; and display the volume level on the upper corresponding liquid crystal. Display range (0-9), 0 means volume off, 9 is volume maximum.
(3) The lower button delivery speed +, delivery speed -, control the increase and decrease of delivery speed; and display on the upper corresponding liquid crystal, display range (1-4), 1 means maximum delivery speed, 4 means minimum delivery speed.
C. Automatic delivery system, simulating the whole process of childbirth. The advanced delivery and first aid simulator (mother) has normal perineum and elastic cervix installed in the model when it is shipped from the factory, please use lubricant to lubricate the head of the fetus, the birth canal and the perineum and other parts, to prevent perineal tear (Note: the elastic cervix and the head of the fetus should not be in close contact for a long period of time, in order to prevent damage to the elastic cervix). During the various steps of labor, especially the delivery of the fetal head, it is necessary to assist the labor movement, the model automatic delivery system can simulate the normal delivery, you can practice the process of assisting the labor and perineal protection techniques. It is easy to observe the whole process of labor and the position of the fetal head in the birth canal in relation to the plane of the sciatic spine. The occipitofrontal position (head first) is the most common in normal labor, accounting for about 90% of cases. This model demonstrates the steps of normal labor in the occipital right anterior position, and can teach the actions of articulation - descent - flexion - internal rotation - elevation - reset and external rotation - delivery of the fetal shoulder. This model can also simulate and demonstrate the process of difficult labor (abnormal fetal position with breech presentation) and assisted delivery. Abnormal fetal position accounts for about 10% of clinical cases.
It simulates the placement of the fetus in normal and abnormal positions (cephalic or breech, etc.). Simulation of the position of the fetal head in the birth canal (before the onset of labor, at the level of the sciatic spine, and at the opening of the uterus).
2. How to use the abdominal wall for auscultation:
Maternity palpation examination, that is, prenatal examination four-step palpation practice; first in the maternal abdomen with fingers to remove the palpation of the abdominal wall, and then remove the mechanical axis of the automatic delivery system, installation of the “Leopold lifting cushion”, so that the cushion notch covers the part of the delivery machinery, and make the cushion rounded end facing down, with a black balloon inflatable catheter to make the airbag fully inflated, make the cushion lift up, put the fetus on the cushion, simulating the placement of normal and abnormal fetal position, can be performed. The cushion is lifted up, and the fetus is placed on the cushion to simulate the placement of normal and abnormal fetal position, and then the palpation abdominal wall is mounted on the mother's abdomen, and then the four-step palpation method of prenatal examination can be practiced (the examiner is facing the head end of the mother, and the first step is to examine the part of the fetus on the uterine fundus; the second is to examine the two sides of the abdomen to determine the dorsum of the fetus; the third is to examine the part of the fetus over the pubic symphysis, to determine the part of the fetus that is exposed first and to determine (In the fourth step, the examiner faces the woman's feet, and further checks the preeclampsia and the degree of articulation above the pubic symphysis).
Multiple fetal heart sounds auscultation practice; first, connect the fetal heart sounds auscultation connecting wire on the inner surface of the abdominal wall of the audiostat with the fetal heart sounds auscultation connecting wire interface located in the mother's chest (the design of the model does not need to be connected to the fetus), and then install the fetal heart sounds auscultation loudspeaker at the umbilical cord of the mother or at the concave part of the left lower abdomen or the right lower abdomen, and then install the abdominal wall of the audiostat at the mother's abdomen, so that a variety of simulation of fetal heart sounds can be carried out. (Note: Fetal heart sounds can be simulated and practiced in the umbilical cord or the left lower abdomen or the right lower abdomen in three different parts of the mother. (Note: When auscultating fetal heart sounds in the umbilicus or the left or right lower abdomen, it is necessary to move the fetal heart sound auscultation loudspeaker to the corresponding depression on the inner surface of the abdominal wall).
3、Maternal tracheal intubation
A. Preparation before use
Note: Laryngoscope\dental pads\resuscitator\mask should be prepared by yourself.
B. Transoral endotracheal intubation
Pre-intubation preparation: check the laryngoscope - the laryngoscope lens has been correctly attached to the lens handle and the pre-lamp is on; check the catheter sleeve - inflate the sleeve at the front end of the catheter with a syringe to make sure that there is no leakage of the sleeve, and then evacuate the sleeve of gas; the catheter head end, the sleeve and the surface of the endotracheal tube are smeared with lubricant using a soft cloth, so as to facilitate the sliding insertion of the catheter.
Endotracheal intubation was operated under clear vision via the mouth:
1) The model's head is tilted back as far as possible (cushions or pillows can be used to elevate the occiput and stretch the head), and the lower jaw is raised so that the path from the lips of the mouth to the epiglottis is almost in a straight line (so that the axes of the mouth, pharynx, and larynx basically overlap in a straight line).
(2) The operator stands on the side of the head of the model, holds a laryngoscope with illumination in the left hand, and places the laryngoscope along the right corner of the mouth of the model, avoiding the incisors. The laryngoscope was placed along the dorsum of the tongue to the root of the tongue, and the laryngoscope was lifted up slightly to see the edge of the epiglottis, and then the anterior end of the laryngoscope was placed at the junction of the epiglottis and the root of the tongue.
(3) After exposing the vocal folds, hold the tracheal tube in the right hand, align its anterior beveled port with the vocal folds, and gently insert the catheter into the trachea in a smooth manner. The catheter is inserted into the vocal folds for about 1, and then continues to rotate to penetrate deeply into the trachea for about 4 cm in adults and 2 cm in pediatrics. Generally, the length of the whole intubation for adults is 22cm-24cm (the length of the whole intubation can be customized according to the patient's condition).
4) Plug a dental cushion next to the tracheal tube, and then withdraw the laryngoscope.
5) If the catheter is inserted into the trachea, both lungs will be inflated during inflation (plastic bladder bag); prevent the catheter from being mistakenly inserted into the esophagus.
6) After confirming that the catheter has been inserted into the trachea with accuracy, secure the catheter and dental cushion properly with a long piece of tape.
7) Inject an appropriate amount of air into the sleeve with a syringe. The sleeve can be inflated to make the catheter airtight against the tracheal wall to prevent leakage of air from the mechanical respirator when delivering air to the lungs, and to prevent backflow of vomitus, secretions, etc., into the trachea.
8) The catheter can be connected to the resuscitator by squeezing the resuscitator capsule to blow air into the catheter.
9) Empty the sac with a syringe and pull out the cannula.
4. prenatal cervical examination:
Before performing the cervical examination training, check at the perineum to make sure that the normal perineum has been fastened with a metal clasp, and then insert the cervical module in the pelvis to match up with the normal perineum.
Cervical Examination:
This model provides 6 cervical modules in different stages of dilatation, a vaginal speculum (vaginal dilator) can be used to observe vaginal and cervical changes, the model must be used as if the patient is being treated, the examiner should wear gloves to examine and use lubricating powder to lubricate the fingers, the use of lubricating powder to coat the vaginal speculum and the surface of the model facilitates the insertion, and the use of the bicameral diagnostic examination to check for cervical changes, i.e., size of cervical os and degree of loss of the cervical canal, and the position of the head to the sciatic spine. and the position of the fetal head in relation to the sciatic spine.
The size of the cervical opening, the degree of loss of the cervical canal, and the position of the fetal head in relation to the plane of the sciatic spine were modeled as follows:
Size of cervical opening
Degree of loss of cervical canal
Relationship between the position of the sciatic plane
Dilatation of the cervical opening
No disappearance of the cervical canal
-5
Dilatation of the cervical opening by 2 cm
Loss of 50% of the cervical canal
-4
Cervical opening 4 cm dilated
Complete loss of cervical canal
-3
Cervical dilatation 5cm
Complete loss of cervical canal
0
Cervical dilatation 7cm
Complete loss of cervical canal
+2
Cervical dilatation 10cm
Complete loss of cervical canal
+5
Cervical changes module simulates 6 stages of cervical dilatation changes
5. Perineal incision and suture model:
The episiotomy suture model can be used to perform episiotomy, suture and post episiotomy wound care exercises. Before performing episiotomy and suture operation training, the normal perineum metal clasp is removed from the perineum, the normal perineum is taken out, and replaced with the episiotomy suture module, and the metal clasp is fastened.
The Perineal Incision Suture Module comes in sets of 3 components; 1) showing the right posterior-lateral incision of the perineum: 2) showing the median incision of the perineum: and 3) showing the left posterior-lateral incision of the perineum. Three kinds of perineal incision and suture exercises can be performed to prevent damage to the external anal sphincter during incision.
6. Ligation of the umbilical cord and delivery of the placenta:
Normal placenta with umbilical cord can be practiced for umbilical cord ligation, umbilical cord clamp can be used (umbilical cord length 60cm). Cord wrapping can be demonstrated.
Normal placental position and delivery of the placenta can be simulated; the normal placenta is attached to the anterior, posterior or lateral wall of the uterine body.
Multiple placental positions: placenta previa can be demonstrated, with the placenta attached to the lower uterine segment, even reaching or covering the endocervical os.
Placental fragment retention can be demonstrated: there are 2 pieces of placental fragments that can be retained in the uterine body.
7. 48 hours postpartum uterine bleeding and fundal massage:
Before performing the 48-hour postpartum uterine bleeding and fundal massage operation training, the normal perineum metal clasp is uncovered at the perineum, and the normal perineum is removed and replaced with the 48-hour postpartum uterus and perineum connected to the vaginal and rectal components, and the metal clasp is fastened. Its vaginal interface can be matched to the 48-hour postpartum uterine cervical interface connection. It can simulate postpartum uterine bleeding and fundal massage.
Simulation of postpartum uterine bleeding: The postpartum uterine attachment catheter is connected to the side of the uterus via a Y-shaped receiver at one end and to the side of the vagina at the other end, and a syringe can be injected with simulated blood via the catheter to simulate postpartum uterine bleeding.
Simulation of fundal massage: the inflation hole of the uterine fundus of the postpartum uterus is connected to the pressure ball inflatable catheter (black pressure ball inflatable catheter of “Leopold's Lifting Cushion” can be used), and the pressure ball can expand the intrauterine air sacs when pressurized to inflate the pressure ball, so as to make the uterus dilated and the fundus of the uterus elevated. The uterine fundus can be massaged by hand to reduce the size of the uterus and lower the uterine fundus, so as to achieve the purpose of uterine hemostasis.
8. Intravenous injection in the maternal arm, drug treatment and fluid input
Name: manager zheng
Mobile:0086-13588958091
Tel:0086-0577-62626932
Whatsapp:8613588958091
Email:sales@kangmugroup.com
Add:qiaoqian industrial zone, liushi wenzhou, zhejiang,325600,china
We chat